Zig-Zag Side Bunch


Sooooooooooooo! It’s been an absolute hot minute..(over a year…sigh!), because life happened.  But we’re back!!!!! Yay!!!!!

Here’s a gorgeous simply complex (pun intended..ha!) style to kick things off again, especially for those of us planning for special occasions this time of year, i.e parties, church, dinners, etc….‘‘tis the season”.  It takes a little more time than the average 30 mins but it’s worth it.  So here goes:

1. always begin by parting the front for the fringe.

2.Then decide which side you would like the final bunch to fall.

3. Take your time to divide the hair into sections according to your direction.  I believe mine was divided into 6 parts.

4. Band each section so it’s all ready to braid.

5. Braid the fringe parting according to your child’s face, some may not even require a fringe, mine was to the sides of her face and beaded.

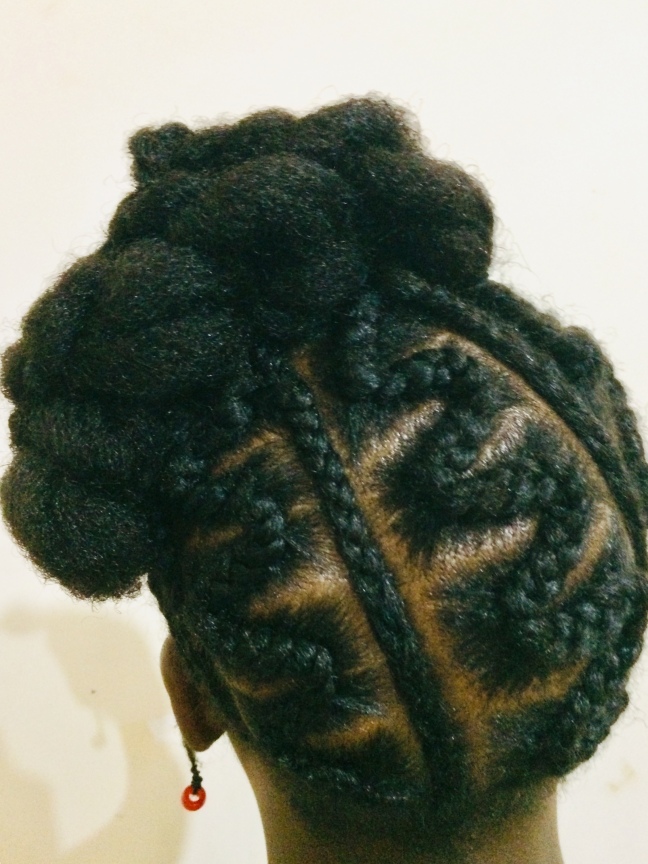
6. For the  updo, begin each section by parting some hair in the direction of the section, so it has a curve (horizontal, then vertical) and then braid.

7. For the zig-zag, part hair horizontally, one by one, then clipping each part in opposite directions so it’s fluid to braid.

8. Braid zig-zag to the top and band together with single vertical braid, loosely twist the rest of the hair to the tip.

9. Do the same for rest

10. Loosely braid the loosely twisted ends together towards the side direction you desire and tuck end inwards.

YOU DID IT!!!! Yaaaaaaaaaay!!!

A gorgeous simply complex hairstyle

You’re more than welcome to use gel etc…in the hair, I only use head wraps to keep it looking neat.  You can also add accessories like bows or flowers to kick it up an extra gear.  I forgot, but the style held it’s own.

Now! Enjoy your special occasion

Be-Inspired

Twist’Falls


Going out, need it quick, no time for cornrows or braids, but you want it unique and with some class.  Well here’s a style for you.

With a cascade of large twists falling to the side of the hair like a waterfall, its no wonder how it got its name.

Whether it lasts for more than a day depends on hair texture, thickness and length, and how well the child can keep it during the nights with a head wrap on.  My daughter is very responsible so she makes sure her head wrap stays on during the night.  Don’t ask me how, she’s not the greatest sleeper…hahaha!

Doing this style is as simple as 1, 2, 3, 4.  Once you have decided you know which side of the head you want the style to fall;

  1.  part the hair initially with the tail of the comb to get the outline, then using the other-side of the comb, neaten your partitions.  The neater the better it will look, then loosely band each bunch.
  2. Using a strong hair band, properly secure it to the base of each bunch.
  3. Do large twists on the end of each bunch.
  4. Pin into place…..and…….

Tadaaaaaaaaaa!!!!!! hairstyle complete, so simple.  I do not use any gel or sprays, just head wraps, but you’re more than welcome to and it may even help keep it in longer.

In all honesty, I banded the hair too tight and by the end of the day, my daughter was complaining and then took it out….lesson learned and a tip for you.  Make sure when your banding, that its secure enough, but don’t make it too tight, otherwise your child may complain and take it out like mine did..lol!  And it looked so good on her too, well! next time ey?

Enjoy your day out, i’m sure there’ll be smiles all around.

Be-Inspired.


Part’n’Twist UP


Laptop issue resolved now…whew!!!!

So starting off again with another beautiful updo for a special occasion (church, wedding, party, christening etc), this gorgeous hairstyle was accomplished using a previous technique of a part’n’twist hairstyle (please re-visit for reminder), designed upwards.

The style was finished using a bow to the back of the head, because I absolutely love a bow in the hair.   I might endevour to change it one day in the future cos change can be a good thing..haha!   However, any hair accessory will work on these up-do’s (flower’s, ribbon’s, clips etc), and you can place them to the front, side or back as I have done.   Alternatively, you do not have to add one at all, but you may find it gives a beautiful finish to the style.

The bun was tucked in just using my hands to roll the twists forward and using a hair grip to keep it in place, very simple.

Once again the fringe can be adapted to work with the shape of your child’s face.  I decided to give my daughter a front facing single twisted fringe as she’s always wanted one (a little treat for her and she loved it).

This style turned out much better than I had anticipated and I’m so pleased with it, my daughter looked awesome in it, and I’m sure you will find your child will look awesome in the style too.

Enjoy..xx

Be-Inspired

Twist-Cornrow, Tucked-UP

It feels like it has been a long time since I made a post, life seems to have caught me up a little.

Well how about starting again with one of my favorite looks when it comes to cornrows, and that is the ‘twist-cornrow’ or what others may know it as, ‘flat-twists’.  The normal braided cornrow is the ultimate loved hairstyle, however if you want to give the style a slightly more elegant look, the twist cornrow is the way to go.

I just decided to do an up-do where I tucked in the ends of the twists with a few pins, with absolutely no real thought into the pattern, but the twist-cornrow is as versatile as the normal braided cornrow (meaning you can do any style you want).  I will venture to do more styles with twist-cornrow so you can have more ideas as to its versatility.

There are a few differences when it comes to twist-cornrow compared to the normal braided cornrow:

1).With a normal cornrow the hair can be quite short, quite fluffy, woolly or thin and it can still last a little while, because of the tightness of the grip in the braid, however it may look thin in its presentation.  

2).On the other hand with twist-cornrow the hair can still look nice and full, but may not last as long as a braided cornrow with short, fluffy, woolly or thin hair.

3).Also if the hair is very thick or full, it may not be a good idea to use twist cornrow as it may make the hair look too bulky and out of shape.

TIP: Whether twist-cornrow or braided cornrow, always make sure to wrap the hair for bed as it allows the hair to last longer.

This is a great alternative for the original braided cornrow….go ahead and give it a go if you haven’t already.  I’m sure you will fall in love with it as much as I have.

Enjoy!!!!

Be inspired.

A touch of class updo


This hairstyle was based purely on inspiration.  A huge thumbs up to it’s creator.

It’s such a beautiful hairstyle which ended up being done for a special occasion.  The simple mirror reflection of both front and back makes this hairstyle very classy for any special occasion.

Once again the ends of my daughters hair has been finished with twists to give it a fuller look.

This hairstyle, I believe can be done on any face or head shape and will suit all hair types.  There may need to be some length to the hair in order to get the fluid grip of the hair at the top, however I believe it could be adapted to work on even the shorter types of hair lengths with extremely long hair needing to be wrapped in a bun to still permit that neat look at the top.

Quite a few variations of this style could be created from this look, and maybe some time in the future (when I begin to run out of hairstyle ideas..lol!) I will do a variation of this hairstyle to give ideas to those who may want it.

Overall, I love this hairstyle.